-
GLOBAL
SITE -
LANG
- Select Language
- Afrikaans
- Albanian
- Arabic
- Armenian
- Azerbaijani
- Basque
- Belarusian
- Bulgarian
- Catalan
- Chinese (Simplified)
- Chinese (Traditional)
- Croatian
- Czech
- Danish
- Dutch
- English
- Estonian
- Filipino
- Finnish
- French
- Galician
- Georgian
- German
- Greek
- Haitian Creole
- Hebrew
- Hindi
- Hungarian
- Icelandic
- Indonesian
- Irish
- Italian
- Japanese
- Korean
- Latvian
- Lithuanian
- Macedonian
- Malay
- Maltese
- Norwegian
- Persian
- Polish
- Portuguese
- Romanian
- Russian
- Serbian
- Slovak
- Slovenian
- Spanish
- Swahili
- Swedish
- Thai
- Turkish
- Ukrainian
- Urdu
- Vietnamese
- Welsh
- Yiddish
-
통합검색 활성화
통합검색 닫기
검색창


Campus Life
Gyeongnam’s national flagship university representing Korea
Setting static IP address
-
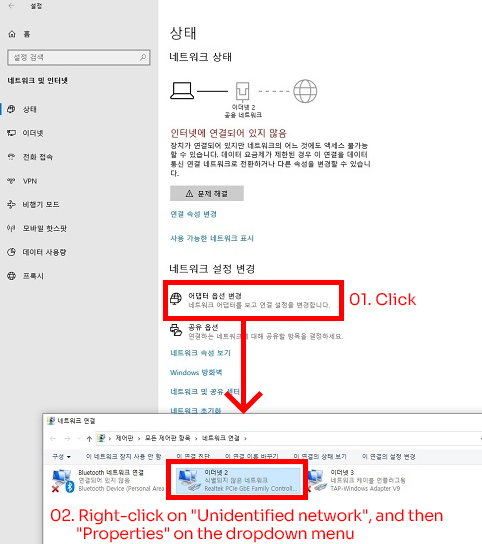
01.Click the right button of the mouse on the network icon at the taskbar, and select "Open Network & Internet settings" from the dropdown menu.
Connect the Ethernet cable (not from wireless router) into the computer → right-click on the network icon → "Open Network & Internet settings"

-
02.Click on "Change adapter options" on the Settings window, and then click the right button of the mouse on the icon with the description "Unidentified network" on the Network Settings window to open the dropdown menu.
-
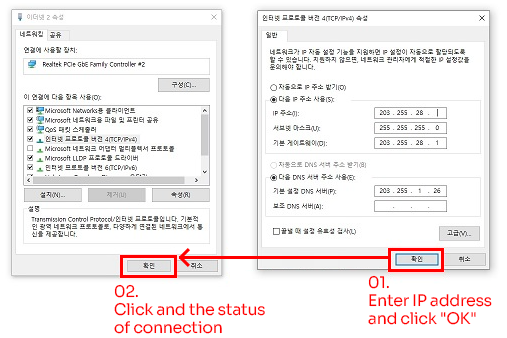
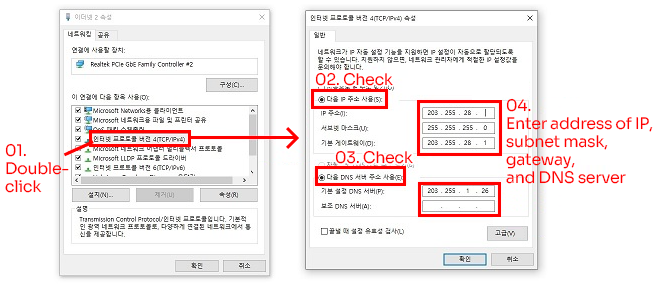
03.Double-click "Internet Protocol Version 4 (TCP/IP)" on Ethernet Properties window, then check on "Use the following IP address" and "Use the following DNS server addresses" on Internet Protocol Version 4 (TCP/IP) Properties window, and then enter IP address, subnet mask, default gateway, and DNS server address (203.255.1.26).
-
04.When the address entering is completed, click "OK" buttons to close windows of Internet Protocol Version 4 (TCP/IP) Properties and Ethernet Properties, and then check if using the internet is available. Precaution: If you do not have the address information of IP, subnet mask, and default gateway, contact Office of Information Systems and Technology to identify them. In order to get IP addresses assigned, you must apply to the Office of Information Systems and Technology as well. (Note: IP address is assigned to the user's computer (workstation, personal computer with Windows, Macintosh, etc.). Also, since a computer can have only one unique IP address, do not share one IP address on multiple devices simultaneously. If you do that, the Internet would be unavailable on all of those devices.)